¶ Chart of Accounts
Usage: The “Set up a chart of accounts” screen is used to create and customize the hierarchical structure of your company’s financial accounts. The chart of accounts is the backbone of your accounting system, categorizing all financial transactions.
¶ User Permissions and Access
-
User Role: Administrative user or any user with permission to add/edit the chart of accounts.
-
Navigation path: General Accounts > Master Data > Chart of Accounts.
-
Import: A button that allows you to upload a pre-existing chart of accounts from an external file into the system.
-
Configuration (Level Number - Level Name - Number of Digits):
- Level Number: Specifies the account level in the hierarchy (e.g., Level 1 for Assets, Level 2 for Current Assets).
- Level Name: Gives a name to the level (e.g., Main, Sub, Detailed).
- Number of Digits: Specifies the number of digits assigned to each account code at that level, which determines the length of the account code.
-
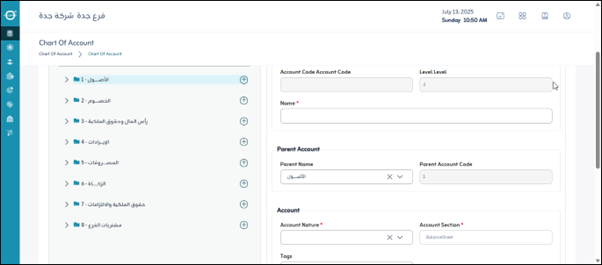
Account Code: The unique identification number for each account in the chart of accounts.
-
Account Name: The name of the accounting account being created (e.g., Cash on Hand, Sales Revenue).
-
Main Account Name: Displays the name of the parent account (the account under which the current account falls) within the hierarchy.
-
Parent Account Code: Displays the parent account code (the account under which the current account falls).
-
Parent Account Data
-
Account Nature: Specifies the primary classification of the account (e.g., Assets, Liabilities, Equity, Revenue, Expenses). This is necessary to determine its position in financial reports.
-
Account Section: An additional account classification that may refer to a specific section (e.g., banks, customers, suppliers, service sales).
-
Tags: An optional field for adding tags or keywords to the account, which aid in filtering or grouping for custom reporting purposes.
-
Details Account Indicator: Determines whether this account will allow direct transactions to be recorded or whether it is merely a primary account that cannot be directly recorded. Detailed accounts are the ones for which daily entries are made.
-
Account Activation (Active - Inactive - Periodic Active):
- Active: Means the account is available for use and transaction recording.
- Inactive: Means the account is not available for recording. This is typically used for accounts that are old or no longer in use.
- Periodic Active: An option that allows the account to be activated for specific periods (such as certain seasons).
-
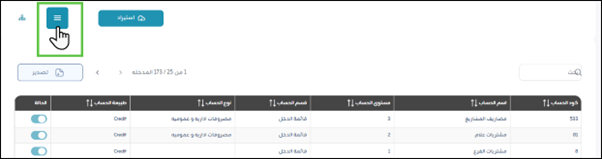
Note: The chart of accounts appears on the right side of the screen. You can click the “+” button next to a primary account to add a new account related to the primary account you selected.
-
Note: You can click this button to display the accounts in the chart horizontally.
Save: After entering the previous fields, the user clicks “Save” to save the accounts defined in the chart of accounts.