¶ Journal Entry
Usage: The Journal Entries screen is the primary tool for recording and tracking all financial transactions in the accounting system. This screen allows you to manually enter accounting entries and specify all related details to ensure the accuracy of your financial records.
¶ Prerequisites
- The user must have permission to access the entry screen.
- The user must have the appropriate permissions to view, modify, or perform operations on the restrictions.
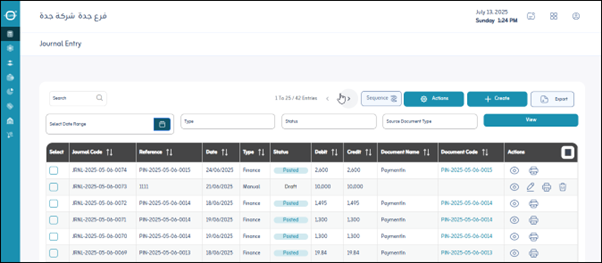
Upon entering the screen, you will find all the journal entries previously defined in the system. The user can do the following:
- Click “Export”: To download a PDF or Excel file to the user’s device containing the journal entries recorded in the system.
- Add New Entry: This button is used to create a new journal entry. Clicking it will take you to the entry screen for the detailed data entry of the entry.
¶ Available Actions:
- Repeat: This function allows you to duplicate a previously existing journal entry. This is very useful for recurring entries, as it saves time and effort in re-entering data.
- Reverse: This function is used to reverse a journal entry entered in error or to cancel the effect of a specific transaction. When you reverse an entry, a new entry is created with the same values but with the debit and credit values reversed.
¶ View by Filter
This section allows you to search and view entries based on specific criteria to narrow the results and facilitate the review process:
- Date: You can view entries entered within a specific date range.
- Entry Type: If there are different types of entries (such as purchases, sales, and settlements), you can filter by type.
- Entry Source: Specifies the source of the entry, such as a sales invoice, purchase invoice, disbursement voucher, or manual entry.
- Entry Status: Used to specify the entry status (e.g., draft, approved, posted, canceled).
¶ Sequence Settings
These settings are used to determine how entries are automatically numbered:
- Allowed: Indicates whether the system allows manual entry numbering or whether it will rely solely on automatic sequencing.
- Sequence Applies to:
- Company: The sequence is company-wide.
- Branch: The sequence is specific to each branch of the company.
- Unit: The sequence may be at the level of a specific organizational unit within the branch.
- Screen: The sequence only applies to entries entered from this screen.
- Sequence Type:
- Annual: The sequence resets to 1 at the beginning of each fiscal year.
- Monthly: The sequence resets to 1 at the beginning of each month.
- Daily: The sequence resets to 1 at the beginning of each day.
- Continuous: The sequence continues to increment without resetting based on a time period.
¶ New Entry Details (After clicking “Add”)
¶ Journal Entry Data Table (Entry Lines)
This is the most important part of the journal entry screen, where the accounts affected by the transaction and their values are identified:
- Account Code: Enter or select the accounting account code affected by the transaction (e.g., 1101 for cashiers, 2101 for suppliers).
- Account Name: The account name appears automatically based on the entered code.
- Line Description: A specific description for each entry line (e.g., “Pay Invoice No. 123”).
- Debit Value: The amount debited to this account in the original currency of the transaction.
- Credit Value: The amount credited to this account in the original currency of the transaction.
- Currency: The original transaction currency for this line (e.g., US Dollars, Euros).
- Conversion Factor: The exchange rate of the foreign currency to the local currency on the entry date.
- Local Debit Value: The amount of the debit amount after converting it to the local currency using the conversion factor.
- Local Credit Value: The amount of the credit amount after converting it to the local currency using the conversion factor.
- Cost Center: Used to allocate the amount to a specific cost center (if the system supports cost center accounting).
- Actions (Copy or Delete):
- Copy: Copy the current entry line, speeding up the process of entering similar lines.
- Delete: Delete the current entry line.
Note: If the journal entry is posted, the user will not be able to edit or delete the entry.
Save: After entering the previous fields, the user clicks “Save” to save the journal entries.